I had to drape some material on the stand using different techniques such as pleating and ruffling, using human physiology as a source of inspiration. I found an old manual I have had for many years on this particular subject, and using some of the images in the book, applied them to my research.
To begin, I was fascinated by the rib cage, how it protects our vital organs, and has some flexibility to allow for the process of respiration. This particular area inspired me to add pleats to my first drape. Pleats emanate from a gathered ruffle that sits on the shoulder, imitating the ribs. Curving towards the centre front, the direction of the pleat changes underneath the bust area, falling naturally, giving a very flattering shape.
There are two main types of muscles. Involuntary muscles which we have no immediate control over, such as the the heart beating and stomach movement. Voluntary muscles are usually attached to bone via tendons, allowing control of movement. It appears that the muscles overlap one another at different points within the body. To give a similar effect, I used the rear of the mannequin, and folding and overlapping the fabric gave an eye catching technic which could be used on the back of a jacket.
When we are born, our teeth are already sitting within our skull, waiting for the right time to emerge. Of course, each set of teeth appear depending on our age, and some people even have extra teeth, within the gum and the palate. The drapes I did consist of extra folds protruding from the shoulder above the body line, a similar shape to a canine tooth. The folds are simple and would connect underneath the collar.
A diagram of the circulation system shows the veins, arteries, heart and lungs within the chest cavity. For my drapes, I decided to focus on the lungs, and take them from the chest, to the top of the shoulder, creating a fan like detail protruding from the full shoulder, resembling the shape of a lung.
The structure of the hepatic lobule within the liver, has a series of veins and arteries that carry oxygenated blood.
The diagram reveals a pattern of branches that carry this blood to is required destination. I found this an unusual example, and simply cut into some fabric to exhibit a similar pattern. 

 |
| Folds representing the spine. |
This series of folds reminded me of a spine. I took inspiration from it and moved the folded pleats to the front of the bodice area, along where the princess line seams would be.

 These two pictures are of the same adaption, bearing a similarity to tendons inside the body which look stretched and tapered.
 |
| Ligaments in the arm gave me the idea for these shoulder folds. |
 The tendons in the hand look
criss-crossed, overlapping each other. I decided to create a fairly similar effect around the bust area. This was just a concept, one that I probably wouldn't use as the twisted area of fabric looks a little bulky.
 |
| Twisted fabric around the bust representing tendons in the hand. |
Other drapes on the stand representing various parts of the body, some of which have already been applied to folds and drapes.
 |
| Once again, the lungs inspired me to create this draped effect. |
 |
| The tendons were inspiration for this. |
 |
| Muscles in the arms and shoulder gave me this idea. |
 |
| This was representational of the heart. |
 |
| This drape was adapted form an anatomical image of the digestive system, proving you can take inspiration from a functional yet repulsive image, and turn it into something quite beautiful |
Draping ideas

Draped Jacket Design
 |
| This drape was created with the shoulder back muscles in mind. It was my chosen design idea , used to work from and develop for my draped jacket design. |
The following pictures show some of my progress during my pattern making for my draped jacket. It was very difficult in the beginning to accurately construct precise measurements within the pattern, done firstly on a stand.
The most difficult part of the pattern was constructing the folds on the left hand side of the jacket. The calico fabric was used first to create the folds and I had to piece it and pin it as I developed it. The fabric had a tendency to misbehave and I decided a more flexible fabric would be more appropriate. I also began to confuse myself with the markings on the fabric, obviously there was so many adaptions, I decided to start again on different fabric.
 Firstly, I draped the fabric on the stand until I was satisfied with the angles and the positions of each fold. I then pinned it securely to the stand, and began to mark notches, lines and grains on the fabric.

Once the markings were done, I took the fabric from the stand, opening it out on to pattern paper, transferring the patern onto the paper, ensuring all markings, lines and notches, were present.

 The Fabric pattern was the put back into the fold, positioning it accurately, marking notch to notch and line to line, and I then began to sew around the neckline, therefore making a toile of my first set of folds.
I continued the process for the other two set of fold. These were a lot more straight forward as the design had positioned them on a flatter area of the body, and not a curved neckline such as the first one.
 |
Right side folds positioned on the mannequin.
|
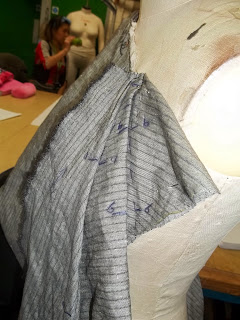 |
| Right side folds shown at a different angle. |
 |
Folds at the back hang from the waist.
Notches and markings can be seen on the toile. |


 These two pictures are of the same adaption, bearing a similarity to tendons inside the body which look stretched and tapered.
 The tendons in the hand look


 Firstly, I draped the fabric on the stand until I was satisfied with the angles and the positions of each fold. I then pinned it securely to the stand, and began to mark notches, lines and grains on the fabric.


No comments:
Post a Comment